Setelah pada postingan sebelumnya yaitu
Seni Photography Macro.yang menampilkan beberapa foto dengan tehnik macro,nah kali ini penulis akan memberikan tips dan settingan kamera yang digunakan dalam fotography macro.berikut ada 10 Sampel Photo dengan Tehnik Macro.
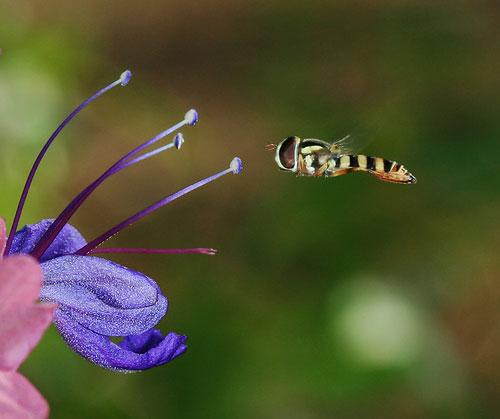
1. Hoverfly in flight
Photograph of a hoverfly in flight was taken with a Canon 400D SLR entry level camera, a
Canon EF 100mm f/2.8 Macro lens and a Canon Macro Twin Lite MT-24EX flash.
Exposure (
shutter speed): 0.005 sec (1/200)
Aperture: f/11
Focal Length: 100 mm
ISO Speed: 200
Exposure Program: Manual
Metering Mode: Pattern
Macro photography tip #1: If possible, use a ring flash or twin lite flash when shooting macro. It will allow you to shoot at a reasonable speed, yet enable you to keep the aperture on a high f/11 for sufficient depth of field. Of course, I understand it isn’t always possible for fellow DSLR photographers to purchase such equipment. No problem, keep reading for other tips.
This macro photograph of a flying insect was taken in a shady part of the garden. Using a Canon Macro Twin Lite MT-24EX flash allowed me to keep the aperture on a high f/11 without sacrificing shutter speed (exposure). Having the ability to keep the shutter speed at a fast 1/200th of a second allowed me to capture the moving insect sharply. It also allowed me to hand hold the camera without the use of a tripod. Like many macro photographers, I find a tripod really restrictive when photographing insects.
Macro photography tip #2: Learn to use manual focus when shooting insects. As the hoverfly was constantly moving, I found turning off the lens AF (automatic focus) function made the job so much easier. If I hadn’t turned this lens setting off, it would have kept swimming or refocusing, making it near impossible to capture a sharp image of the hoverfly.
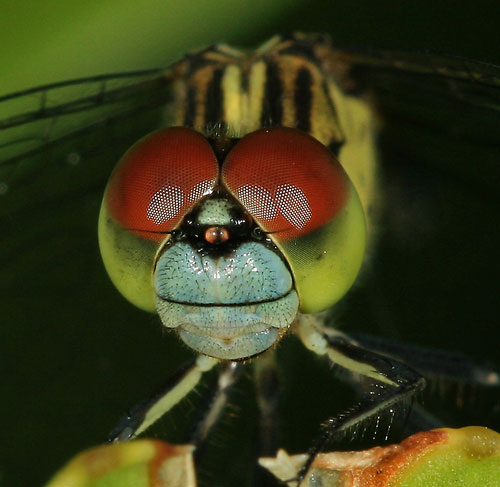
2. Unshaven dragonfly face
This macro was taken with a Canon 400D SLR camera, a Canon EF 100mm f/2.8 Macro lens and a Canon Macro Twin Lite MT-24EX flash.
Exposure (shutter speed): 0.005 sec (1/200)
Aperture: f/11
Focal Length: 100 mm
ISO Speed: 200
Exposure Program: Manual
Metering Mode: Pattern
Macro photography tip #3: Learn how to be patient. Don’t run around like a mad photographer chasing an insect that won’t sit still. In my experience, that doesn’t work! You’ll be surprised how many insects are as curious of you, as you are of them.
I was lucky with this macro shot to have found a curious dragonfly. He sat really still and would allowed me to move in as close as I needed for a detailed macro photo of his whiskers. This also allowed me to keep the camera’s lens set on AF (automatic focus).
Macro photography tip #4: Crop macro images nice and tight, especially for online viewing. The original dragonfly image was cropped with Photoshop CS2 so the dragonflies face takes up the majority of the final composition.
3. Blue dragonfly
Similar to the first two macro photographs, this one was also taken with a Canon 400D SLR camera and a Canon EF 100mm f/2.8 Macro lens.
Exposure: 0.005 sec (1/200)
Aperture: f/11
Focal Length: 100 mm
ISO Speed: 400
Exposure Program: Manual
Metering Mode: Pattern
Macro photography tip #5: Once again, learn patience. This dragonfly come up to me as I sat under a tree, so I took the opportunity to take a few macro shots of it. This is one of my best tips for macro insect photography. I can’t repeat it enough. Personally, I’ve found it hopeless chasing them around like a mad photographer. That only seems to scare them away. Instead, it’s best to be patient and wait until you find a curious insect that is sitting still.
4. Macro water drop
Playing with water droplets, a Canon EF 100/2.8 Macro USM lens and extension tubes. For those that don’t know what extension tubes are, they are a plastic tube that sits between your camera’s body and the lens. When using extension tubes, you need to set your lens to MF (manual focus), because the automatic focus won’t work. Nowadays if you purchase extension tubes that are the same brand as your macro lens, you may be able to keep all the automatic functions (depending on the brand).
Exposure: 0.005 sec (1/200)
Aperture: f/0
Focal Length: 0 mm
ISO Speed: 100
Exposure Program: Manual
Metering Mode: Pattern
Flash: Onboard flash fired, as seen in the water drop.
Macro photography tip #6: Experiment with extension tubes. They are cheaper than you might think. If you view a photographs EXIF data and notice the aperture and focal length are showing as zero (0), chances are the photographer used an extension tube or some piece of equipment that sat between the camera’s body and the lens.
Macro photography tip #7: All the best macro photographers set shots up. This shot of a water droplet was taken with a plastic bag (and a pin hole in it) being held over a fish tank. The camera was then focused past the glass tank and onto the droplet. There is a detailed explanation showing the setup for it at:
How to photograph water drops.
5. What the snake see’s
Photographed with a Canon 400D and a EF 100mm f/2.8 Macro lens. When photographing a friendly carpet snake, it was a great opportunity for a self portrait. If you click on this image and view it in a larger size, you will clearly see exactly what the snake was looking at!
Exposure (shutter speed): 0.033 sec (1/30)
Aperture: f/2.8
Focal Length: 100 mm
ISO Speed: 100
Macro photography tip #8: Use a tripod if you cannot shoot faster than the length of your lens. For example, this photograph was taken with the use of a tripod and a remote release. Having a slower shutter speed of 1/30th of a second, I wouldn’t have achieved a sharp image if the camera was handheld. A general rule of thumb for hand held macro shots, is that if your lens is 100mm focal length, then the shutter speed needs to be at least 1/100th of a second or faster to achieve a sharp photograph. Therefore, if you are shooting in a shady spot of the garden, you will need a tripod to achieve great results.
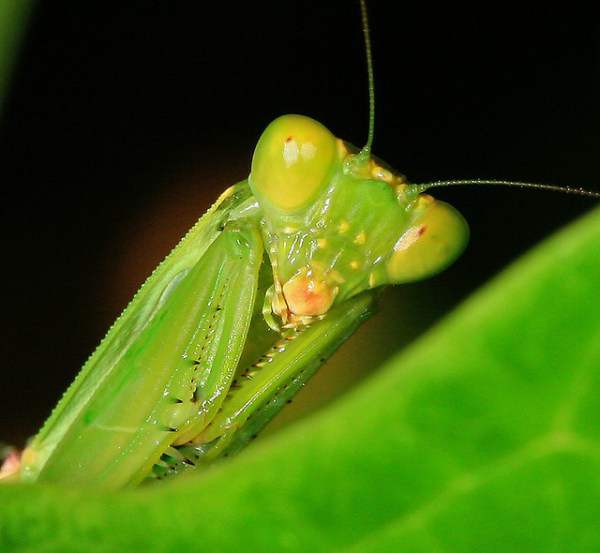
6. Katydid macro
Picture of a Katydid photographed with a Canon 400D SLR and a Canon EF 100mm f/2.8 Macro lens.
Exposure: 0.008 sec (1/125)
Aperture: f/11
Focal Length: 100 mm
ISO Speed: 400
Exposure Program: Manual
Metering Mode: Pattern
Macro photography tip #9: Just because your macro lens can shoot with an aperture of f/2.8 doesn’t mean you should use it. For this shot, the ISO was upped to 400 speed so I could keep the aperture at a higher F number of f/11. This enabled me to get more of the Katydid in sharp focus. One of the mistakes I did when I first purchased my macro lens, was to keep the F number at a low F2.8 (just because I could). Later on I realised this wasn’t always a good idea, unless you intend on getting just the eye of an insect in focus.
7. Eye in the sky (photographed by 2minutes who can be found on flickr)
This macro shot of a butterfly was photographed with a Nikon D40 camera and a Nikon AF-S VR Micro-Nikkor 105mm f/2.8G IF-ED lens.
Exposure (shutter speed): 0.002 sec (1/500)
Aperture: f/7.1
Focal Length: 105 mm
ISO Speed: 400
Exposure Program: Manual
Metering Mode: Pattern
Macro photography tip #10: When shooting macro, shutter speed is more important than ISO. Because this butterfly was moving around quite a bit, the photographer upped the ISO speed to 400, so he could keep a faster shutter speed of 1/500th of a second.
8. Fairyland
Macro photography tip #11: Learn to see. This is what I’ve always imagined fairyland to be like

However, in actual fact it’s a macro shot of the tiniest moss, found at the bottom of an orchid pot. This is the beauty of macro photography, in that you get to really appreciate the smaller things in life and see them in a whole different light.
The camera was a Canon 400D SLR and the lens a Canon EF 100mm f/2.8 Macro.
Exposure (shutter speed): 0.025 sec (1/40)
Aperture: f/5.6
Focal Length: 100 mm
ISO Speed: 200
Exposure Program: Manual
Metering Mode: Pattern
9. Miss Ladybird
Photograph of a ladybird taken with a Canon 400D SLR and a Canon EF 100mm f/2.8 Macro lens.
Exposure (shutter speed): 0.002 sec (1/640)
Aperture: f/7.1
Focal Length: 100 mm
ISO Speed: 400
Exposure Program: Manual
Metering Mode: Pattern
Macro photography tip #12: If you don’t photograph the shot you initially want, that’s ok. The only reason the shutter speed is set to a fast 1/640th of a second in this case, is because I was attempting to capture the ladybird as it flies off. However, I wasn’t too successful this time around at getting one in flight. Although it’s still a personal favorite
10. Butt Heavy
Just had to love how hairy this little fellow was
Photo of a dragonfly taken with a Canon 400D SLR and a Canon EF 100mm f/2.8 Macro lens.
Exposure (shutter speed): 0.005 sec (1/200)
Aperture: f/11
Focal Length: 100 mm
ISO Speed: 400
Exposure Program: Manual
Metering Mode: Pattern
Macro photography tip #13: Make good use of morning sunlight to capture detail not seen otherwise. This particular photograph was taken at 8.30 in the morning with strong sunlight coming from behind the dragonfly. While many photographers don’t like shooting into the sun, I find when it comes to macro photography, it can often help to highlight an insects tiny hairs. You do need to be careful not to capture lens flare though. Sometimes it works, sometimes it doesn’t. Trying numerous angles also helps to find the best position.
Tuturial diatas Berbahasa Inggris,karena dikutip dari situs http://www.slrphotographyguide.com